Installation
Standalone Mode
Install using pip:
pip install cirrocumulus
Launch via the command line:
cirro launch <path_to_dataset>
Full list of command line options:
usage: cirro launch [-h] [--spatial [SPATIAL ...]] [--markers [MARKERS ...]]
                    [--host HOST] [--port PORT] [--no-open]
                    [--results RESULTS] [--ontology ONTOLOGY]
                    [--tmap [TMAP ...]]
                    dataset [dataset ...]
Positional Arguments
- dataset
Path(s) to dataset in h5ad, loom, Seurat, TileDB, zarr, or STAR-Fusion format. Separate multiple datasets with a comma instead of a space in order to join datasets by cell id
Named Arguments
- --spatial
Directory containing 10x visium spatial data (tissue_hires_image.png, scalefactors_json.json, and tissue_positions_list.csv) or a directory containing image.png, positions.image.csv with headers barcode, x, and y, and optionally diameter.image.txt containing spot diameter
- --markers
Path(s) to JSON file that maps name to features. For example {“a”:[“gene1”, “gene2”], “b”:[“gene3”]}
- --host
Host IP address
- --port
Server port
Default: 5000
- --no-open
Do not open your web browser
Default: False
- --results
URL to save user computed results (e.g. differential expression)
- --ontology
Path to ontology in OBO format for annotation
- --tmap
Path(s) to transport maps directory computed with WOT
Server Mode
Cirrocumulus can also be run in server mode in order to serve multiple users and datasets securely. The cirrocumulus server can be deployed on a cloud VM, an on-premise machine, or on Google App Engine.
Install cirrocumulus using pip or docker
Optional additional setup to enable authentication and authorization via Okta or Google:
Install additional libraries:
Google: pip install google-auth
Okta: pip install okta-jwt-verifier
Set environment variables:
CIRRO_AUTH_CLIENT_ID: to your Okta or Google client id
CIRRO_AUTH_PROVIDER: to either okta or Google.
CIRRO_AUTH_ISSUER (okta only). The URL of the authorization server that will perform authentication. All Developer Accounts have a “default” authorization server. The issuer is a combination of your Org URL (found in the upper right of the console home page) and /oauth2/default. For example, https://dev-1234.oktapreview.com/oauth2/default.
See Okta documentation for creating custom app integrations with Okta.
Visit the Google OAuth 2.0 documentation to obtain OAuth 2.0 credentials for Google.
Please note that https is required if using Okta or Google authentication
Additional libraries needed for cloud storage:
Amazon S3: pip install s3fs
Google Cloud Storage: pip install gcsfs
Microsoft Azure: pip install adlfs
Install MongoDB and start the MongoDB server. Note that MongoDB compatible databases such as DocumentDB can also be used.
Start the server via the command line:
cirro serve
Use the prepare_data command to freeze an h5ad, loom, or Seurat file in cirrocumulus format.
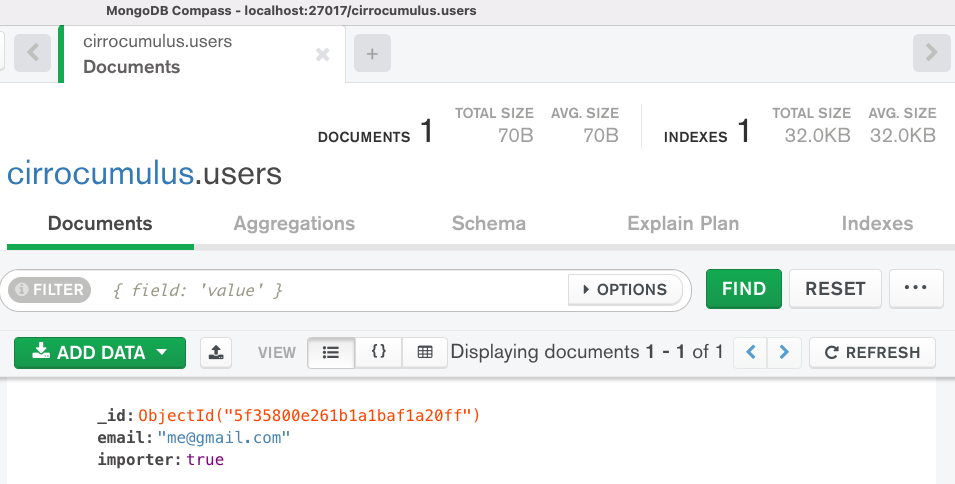
Add a dataset and optionally share with dataset with collaborators. If you enabled authentication, then no users are allowed to add datasets to cirrocumulus. Set the property “importer” to true on an entry in the users collection to enable that user to import datasets. For example, the following screenshot in MongoDB Compass shows that the user with the email address me@gmail.com, is allowed to add datasets to cirrocumulus:
You can programmatically add a dataset by posting to the /api/dataset endpoint:
curl http://localhost:5000/api/dataset -X POST -F 'name=my_name' -F 'url=data/my_dataset_path' -F 'description=my_desc' -F 'species=Mus musculus'
Additional customization via environment variables:
CIRRO_MOUNT: For mounting a bucket locally. Comma separated string of bucket:local_path. Example s3://foo/bar:/fsx
CIRRO_SPECIES: Path to JSON file for species list when adding new dataset
CIRRO_MIXPANEL: Mixpanel project token for event tracking. Currently, only the open dataset event is supported.
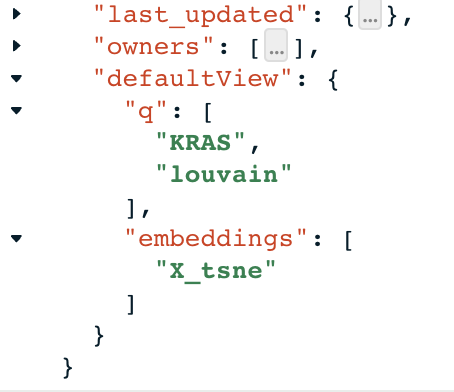
Optionally, set the default view for a dataset by adding the field “defaultView” to your dataset entry in the database. You can configure the cirrocumulus state in the app, then use “Copy Link” to get the JSON configuration for “defaultView”. Example:
Full list of command line options:
usage: cirro serve [-h] [--db_uri DB_URI] [-w WORKERS] [-t TIMEOUT] [-b BIND]
                   [--footer FOOTER] [--header HEADER] [--upload UPLOAD]
                   [--results RESULTS] [--ontology ONTOLOGY]
Named Arguments
- --db_uri
Database connection URI
Default: “mongodb://localhost:27017/cirrocumulus”
- -w, --workers
The number of worker processes
- -t, --timeout
Workers silent for more than this many seconds are killed and restarted
Default: 30
- -b, --bind
Server socket to bind. Server sockets can be any of $(HOST), $(HOST):$(PORT), fd://$(FD), or unix:$(PATH). An IP is a valid $(HOST).
Default: “127.0.0.1:5000”
- --footer
Markdown file to customize the application footer
- --header
Markdown file to customize the application header
- --upload
URL to allow users to upload files
- --results
URL to save user computed results (e.g. differential expression) to
- --ontology
Path to ontology in OBO format for annotation
Static Website
Clone the cirrocumulus repository:
git clone https://github.com/klarman-cell-observatory/cirrocumulus.git
Change to cirrocumulus directory:
cd cirrocumulus
Install typescript:
yarn global add typescript
Install JavaScript dependencies:
yarn install
Prepare dataset(s) in jsonl format:
cirro prepare_data pbmc3k.h5ad --format jsonl
Build JavaScript:
REACT_APP_STATIC=true yarn build
Create the file datasets.json in the build directory:
[
    {
        "id": "pbmc3k",
        "name": "pbmc3k",
        "url": "pbmc3k/pbmc3k.jsonl"
    }
]
Move your dataset files to build:
mv pbmc3k build
Test locally:
cd build ; npx http-server .
Host the build directory on your static website hosting service (e.g. Amazon S3, Google Cloud Storage)
Prepare Data
The prepare_data command is used to freeze an h5ad, loom, or Seurat (RDS) file in cirrocumulus format. The cirrocumulus format allows efficient partial dataset retrieval over a network (e.g Google bucket) using limited memory.
Example:
cirro prepare_data pbmc3k.h5ad
Full list of command line options:
usage: cirro prepare_data [-h] [--out OUT] [--format {parquet,jsonl,zarr}]
                          [--whitelist WHITELIST] [--markers MARKERS]
                          [--no-auto-groups] [--groups GROUPS]
                          [--group_nfeatures GROUP_NFEATURES]
                          [--spatial SPATIAL]
                          dataset [dataset ...]
Positional Arguments
- dataset
Path to a h5ad, loom, or Seurat (rds) file
Named Arguments
- --out
Path to output directory
- --format
Possible choices: parquet, jsonl, zarr
Output format
Default: “zarr”
- --whitelist
Optional whitelist of fields to save when output format is parquet or zarr. Use obs, obsm, or X to save all entries for these fields. Use field.name to save a specific entry (e.g. obs.leiden)
- --markers
Path to JSON file of precomputed markers that maps name to features. For example {“a”:[“gene1”, “gene2”], “b”:[“gene3”]
- --no-auto-groups
Disable automatic cluster field detection to compute differential expression results for
Default: False
- --groups
List of groups to compute markers for (e.g. louvain). Markers created with cumulus/scanpy are automatically included. Separate multiple groups with a comma to combine groups using “AND” logic (e.g. louvain,day)
- --group_nfeatures
Number of marker genes/features to include
Default: 10
- --spatial
Directory containing 10x visium spatial data (tissue_hires_image.png, scalefactors_json.json, and tissue_positions_list.csv) or a directory containing image.png, positions.image.csv with headers barcode, x, and y, and optionally diameter.image.txt containing spot diameter
Developer Instructions
Create a new conda environment:
conda create --name cirrocumulus-dev
Clone the cirrocumulus repository:
git clone https://github.com/klarman-cell-observatory/cirrocumulus.git
Change to cirrocumulus directory:
cd cirrocumulus
Install:
pip install --upgrade pip
pip install -e .[dev,test]
pre-commit install
yarn global add typescript
yarn install
yarn build
pip install -e .
Install additional optional Python dependencies:
pip install s3fs
Create an example h5ad file in ./data/pbmc3k_processed.h5ad:
import scanpy as sc
sc.datasets.pbmc3k_processed()
Launch cirrocumulus with the –no-open flag:
cirro launch ./data/pbmc3k_processed.h5ad --no-open
Alternatively, launch the cirrocumulus server (see prepare_data):
cirro serve
Run JavaScript server in development mode:
yarn start
Navigate to http://localhost:3000
In order to run End to End tests (yarn e2e), please install GraphicsMagick (brew install graphicsmagick on Mac)
Testing:
yarn e2e
yarn test
pytest
Build JavaScript front-end for deployment:
yarn build